Showing posts with label Photography. Show all posts

Friday, April 05, 2024

Holi Tiger

तस्माद्व्याघ्रो वनं रक्षेद्वयं व्याघ्रं  पालयेत् 


Majestic: a king in his kingdom

John Doe were looking eagerly in the direction where the forest rangers were trying to locate a collared tiger sleeping inside bushes. Suddenly, one gypsy driver shouted- पीछे देखो….बाघ पीछे से आ रहा है (Look back..tiger is coming from the other side). It was another tiger who came looking for her mating partner lying in the bushes. Holy cow! We just had our first tiger sighting at the most unlikely place – Sariska Tiger Reserve, a place that became infamous for wiping out its entire tiger population just few years back. 


Holi : the spirit of celebration

As the cold winter breezes transforms into warm dusty gusts heralding onset of Falguna, the transient period before arrival of spring, the whole of India gets ready for a season of festivals like Teej and Mahashivratri. It also is the time for Holi. Harivansh Rai Bachhan saab had eulogized the spirit of the festival of colors in these beautiful lines:

होली है तो आज अपरिचित से परिचय कर लो

होली है तो आज मित्र को पलकों में धर लो

भूल शूल से भरे वर्ष के वैर-विरोधों को

होली है तो आज शत्रु को बाहों में भर लो !

(On this Holi, let’s forget the differences and, let’s give a warm hug not only to friends, but also to foes)

With time, the way we celebrate holi had transformed so much that it makes one scream - नहीं ये है गुलाल-ए-सुर्ख़ उड़ता हर जगह प्यारे Silver and golden humanoids, laced with myriad of industrial dyes, moving around reminds one of the notoriety of holi in Delhi. It has become obvious to look for escape routes when holi is around. शत्रुओं को भूल जाओ, मित्रों से भी दूर भागो।

When the holi of 2011 came knocking, we were looking to get away from Delhi. Getting a booking on short notice was not that tough those days. We set out for Sariska, roughly about 200 km from Delhi.


Sariska : the hunting ground

The former hunting grounds of the Maharajas of Alwar, was notified as a Wildlife Reserve in 1955, then a Wildlife Sanctuary in 1958, and finally a Tiger Reserve in 1979. Maharajahs gone, but hunting continued. Notorious poacher Sansar Chand had systematically exterminated all 25+ tigers from the park in collusion with some villagers settled within periphery of the park. By year 2005, only the name remained as Sariska Tiger Reserve, sans any tiger. The furor that Sariska wipe out created led to the first tiger census of India with latest technique in 2006 that pegged the number of remaining tigers at a shocking 1411.

In a renewed conservation effort to revive a prime tiger habitat, the forest authorities decided to reintroduce tigers at Sariska by relocating 5 tigers (2 males and 3 females) from Ranthambhore. The country's first tiger reintroduction programme using an Indian Air Force MI-17 helicopter in 2008 is well documented by Subiah Nallamuthu ji in Tiger Queen. Tigers were named ST (Sariska Tiger) – 1 to 5. Later, one the five relocated tigers, a male ST-1, was also killed.

Despite the dire situations, the nexus was ugly and apathy was unimaginable. Probably a well  thought out plan for relocation of villages and livelihood of displaced villagers was missing to reduce human-animal conflict. Creating a balance has been a paradox. A report of Indian Express found 12 marble mines operating inside core areas of the tiger reserve even in 2014. This was due to disagreement between forest and mining departments. Money over tigers’ survival! Remember, it was the Forest department's denial mode of extermination of all tigers in the park by 2004-05, and they conituned to show tigers on paper, before the lid was blown off.


Ghost of a chance

A Ghost of a Chance points to the near nil possibility scenario. In probability theory, Kolmogorov's zero–one law,  specifies that a certain type of event, namely a tail event, that will either almost surely happen or almost surely not happen; that is, the probability of such an event occurring is zero or one.

The above theorem was a true depiction of the probability of getting to see a tiger in Sariska in 2011. Four relocated tigers were roaming in an 800+ sq km of forest. Map below gives an idea of how erratic the movements of tigers in the park can be. Therefore our trip was not to see a tiger, but to spend some time in the lap of nature rather than getting laced with industrial dyes. Yet, to utilize the available time, we hopped onto a safari gypsy and set out for an afternoon safari in the park. Safaris were easily available as there were hardly any tourist those days.

Movement map of the 4 reintroduced tigers of Sariska in 2011
Source: Wilflife Institute of India


Holy Tiger

Icarus tigris, also known as The Spirit Tiger, or the Holy Tiger, is an elegant, ethereal and mysterious animal in the legendary comics graphic novel Kingdom Kong. This mystery, coupled with power and grace attached with the tiger makes it so special. And getting to see one in the wild roaming majestically get etched in your memory forever. Even after seeing 30+ wild tigers in these years, I can still recall each and every encounters.

the Holy Tiger

As the safari progressed, we could easily comprehend that finding one of the four tigers in an 800+ sq park is like finding a needle in haystack. It indeed was a tail event of probability theory. Forget tiger, even finding other animals was a tough task. We saw remnants of few settlement and free cattle grazing inside park that was a reminder of the hazard to wildlife of the park. A carpeted road passed through the park where private vehicles were allowed.

The forest was set ablaze by blooming of the Palash or the Flame of the Forest with its orange flame-like flowers set against dried trees and fallen leaves. As we watched our vestige of hopes going up in the dust trails behind our gyspsy, our smart driver noticed a speeding gypsy with forest officials holding up a tracking antennae. All four relocated tigers were collared. There were some so called VIP guest in the gyspsy for whom tiger is being tracked. Our driver immediately understood that the forest officials had found some signal. He turned around to follow them. But the speeding forest car had quickly disappeared in the jungle. It was a cat and mouse chase for us looking for sign of dust cloud left by the forest vehicle, which reminded me of a Hindi movie scene. After few minutes of searching, we could locate the forest gypsy. It was trying to get close to a tiger hidden inside bushes. We lesser mortals, the mango people, could just wait and expect the tiger to come out on road. The news of spotting had spread, and all safari gypsys had arrived at the spot.  

Suddenly, one gypsy driver shouted- पीछे देखो….बाघ पीछे से आ रहा है ( look back..tiger is coming from the other side).

The tiger that was sleeping in the bushes was male ST-4. And the tiger, now majestically walking towards us was female ST-2. Within few minutes both tigers were out in the open. 

Voila! We just had our first tiger sighting of life, that too in Sariska. And two out of the four living tigers of a park larger than 800 sq km were walking in front of us. We could not believe our luck. The escape from Holi was made truly colorful by Tiger. In the map above, the movement pattern of ST-2 is shown in RED and ST-4 in BLUE colours. This will give an idea of how the Ghost of a Chance theorem worked in our favour that evening.

This Holi Tiger played an important role in my becoming a nature and wildlife photographer. I had a Canon 350D those days with a 70-200 F4L lens. In those falling light of that evening, I got tiger ST-2 crossing road in front of my gypsy without any background clutter. I kept clicking. Later I found that only one photograph came sharp.  I understood that wildlife photography in variable and low light is a different ballgame from the constant studio lighting for which I was trained. Time to expand learning. Next stop was the Canon India workshop at Bandhavgarh and Kanha with lessons by Shivang Mehta and Uday Shringi. Rest is history.


Tiger


(Images : The one on Top is my tiger image of ST-2 as a novice in 2011. The one on bottom is a tiger from Ranthambhore clicked in much worse light than that of ST-2 in 2011, but with professional knowledge and gear. Now I also see the awkward angle of ST-2 as I shoot standing high)


Tyger Tyger burning bright, In the forests of the night…..

Relocation of tigers to Sariska has been a success story of conservation efforts. The ST-4 and ST-2 mating we witnessed had produced offspring that propelled next generation. ST-3 and ST-5 died without producing any cubs. Later more tigers were relocated from Ranthambore as that park can hold about 30 tigers only as against 40 of Sariska. Tigers were moving away from Ranthmbhore in search of territory due to over populations. The population started growing at Sariska. A report of 2023, hold the tiger count of Sariska as 30. Each one counts. Humans need to let them flourish. The wisdom from Mahabharata says:

निर्वनो वध्यते व्याघ्रो निर्व्याघ्रं छिद्यते वनम्।

तस्माद्व्याघ्रो वनं रक्षेद्वयं व्याघ्रं  पालयेत् 

                                                    -महाभारत  उद्योग पर्व : .२९.५७

Meaning in English:

If there is no forest, then the tiger gets killed; if there is no tiger, then the forest gets destroyed. Hence, the tiger protects the forest and the forest guards the tiger!

-Mahabharat– Udyoga Parva: 5.29.57


अतः, यदि वन सुरक्षित रखने हैंतो बाघों को संरक्षित करना होगा। Let’s do our bits to save the tiger and save forests. And do keep playing Holi…with safe and natural colours.

Tuesday, December 04, 2018

Capturing the spirit of street-life

Wildlife photography is my preferred genre and will continue to be so in near future. However, like many of my fellow photographers, the visual storytelling side of street photography also has a special appeal to me. This appeal is powerful enough to push me into venturing out 4-5 times during last one year to explore the streets of Delhi, specially the older Delhi. Called the Purani Dilli (Old Delhi), its streets are special. There is a treasure lying to be captured in the busy, over corroded, packed and often dimly lit alleys of Old Delhi. I wish I could go out often.
Staged or As Is:
Street photography is a large term. It actually has many sub-genre. The most common and popular on the social media is the staged street photography. They at time s look awesome. You find the perfect setting, find some actors who will gel with the scene, often pay them in cash or kind, and shoot. You get a near perfect shot for social media. But the form that appeals to me is the shoot as is format. You go out on the street and shoot a scene as it is with real people garnishing it with your creative framing and technical skills, and then present it to your audience with your editing skills. This way you capture moments. While the staged genre will continue to flourish, the moments genre will also hold its special place.

Concept:

It is always good to have a concept in mind to shoot before you step out. If you do not have a concept, then you may find the scene too chaotic. I have seen participants in these walks often trying to shoot what others are shooting. If someone is shooting an old man puffin a bidi, let me shoot that too. And when you see the shots shared later in walk group, you find majority of them crap as they were shoot without any plan or concept. Even if it is not staged, you need a plan and concept to shoot. You will have to find beauty and interest in clutter. You make or create an Image by seeing and capturing differently. Technicalities often takes back seat as you have to shoot fast. Given the general lighting, and your understanding of light and your camera requirement, you set out with a set of basic setting. If a scene appeals to you, aim and shoot framing it the best possible way.
I had tried to create a series of images with a concept of ‘Life In Between’. The images of this series do not require me to connect with the subject. I will come to the topic of connecting to the subject later.

Some bread earned
A Fistful of colours
Pondering
Poles apart....Life of two child

Equipment:

A mirrorless is the best equipment for street photography. This is true for India, at least Old Delhi.
So why a mirrorless for street? I currently own two full frame Canon bodies. For the street outings, I have used the smaller Canon 6D Mark II body with Canon 17-40 F4 lens. Smaller is a relative term. Even the 6D2+17-40 combination looks fairly large as compared to the mirrorless combos. I had found that Canon 6D2 fails you when the light is low and scene has predominantly darker tones. You will come across many such scene once you are inside the labyrinth of narrow alleys of Chandni Chowk like the Kinari Bazar where only natural light you find are wafting through narrow openings. Either you need a F2.8 or better lens and definitely a better body in such places. A cropped body with 18-55 kind of lens is a disaster for those narrow alleys. The other option therefore is the mid-level mirrorless targeted at the prosumer photographers. As they are targeted at prosumer segment, the output is tweaked to be quite good. They boast of an exciting array of lenses. In the last walk, I found that Fuji 18-55 kit lens is a 2.8 at wide angle. This comes a s kit with XT-20 body. The combined size and weight of a cropped body mirrorless is much lesser than my Canon 6D2+17-40. You can easily put them into your bag and carry everywhere. These cameras being small in size, the average people on street will ignore you as a novice, amateur or tourist having fun. The bigger SLR often attracts unwanted attention. These makes you a bigger photographer trying to make money of images of poor people on street.
As I am currently exploring Sony and Fujifilm series for making my next acquisition, I will come back and update this space soon.

Technicalities:

Once out on the street, the technical aspect of camera setting will be least on your mind. Your eyes will be scanning for interesting scene. Rarely you get a second chance. Therefore you have to set your parameters before you start walking. Read the lighting scene and set your Aperture, Shutter Speed and ISO. Reading the available light scene will come from experience. As you will be shooting handheld, you need a minimum shutter speed of 1/60 to get decent frames. Once you have basic settings right, review first couple of shots. Change settings if required. Of course, you will fiddle with settings later as you shoot, but no point changing it after losing a moment. So, get it your initial setting as right as possible. This is true for wildlife also. You need to read the lighting scene and get your first setting as correct as possible.
Ethics:
One important aspect of street photography is to connect with subject. If you are shooting people close up, then you must talk and connect to get the best result. If the subject refuse then simply walk away. But more often than not, the subject is likely to cooperate. Keep in mind that do not try to create a scene of trying to make money of someone’s misery. Sometimes they may ask you for money or help after posing. These are poor people trying to make a living on street. The call is yours. Listen to your conscience. If you ask me, I had done it couple of times by buying a cup of tea or biscuit. I am presenting here few images where we had connected with the subject. Compare these with earlier series of ‘Life In Between’.
When you connect with your subject
Special mentions:
This exploration of city had made me venture out to different old Delhi with various people during last one year. These are Nizamuddin West with Hazrat Nizamuddin dargah and walled city from Turqman Gate to Chawri Bazaar with Asif Khan Dehlvi of Delhi Karavan. These were story telling non-photo walks. As Asif hold the group together with his story telling, I kept exploring with my camera. This continued with exploring the famed Chandni Chowk area from Parantha wali Galli to Dariba Kalan, and Khari Baoli to Sadar Bazar with Sundeep Bali and Fujifilm team. Sundeep is a brand ambassador of Fujifilm who had done a lot of work in old Delhi areas. It was a great experience learning with him.
And finally, this series of images were viewtifully edited on the ViewSonic VP2468 monitor specially designed for photographers.
Note: The author is ColorPro partner for ViewSonic. His and other ColorPro professionals' work can be seen at ColorPro Partners of ViewSonic. The latest series of ViewSonic monitors for Photographers can found at ViewSonic

Saturday, December 16, 2017

Getting true color in editing images

It has been three months since I received my ViewSonic VP2468 monitor designed especially for photographers like me. It has now become permanent part of my editing process. I used to edit a lot on my laptops which provides the flexibility of editing during spare time on my travels. These editing were mostly for social media posting, and hence used to be in small resolutions, typically around 1200px on longer side at 100dpi. Small sizes allow you to get away with many flaws. But whenever the images were to be sent for printing, or to some competition in large sizes, then the flaws of laptop editing became obvious. Believe me, when you blow up, the colours that looked OK in your FB or Instagram post, may look terrible. Colour is one of the factors that can make or kill your image.

A typical LED monitor we use in desktop generally produces about 60-70% of sRGB colour space. Laptops fares worse. This means, despite shooting in Adobe RGB, we were losing 30-40% of colours in editing, which is substantial for quality print. As a nature photographer, the variations in shades of green and greys are very important in my images. If you are not able to see the grade variations, then at time you lose on impact the image could have made. In my next upgrade, I wanted a monitor that can match my output requirement, preferably one made for photographer.

On exploring market, most of the monitors targeted at photographers were found to be exorbitantly priced. Often as a photographer you feel like spending that kind of money on things like upgrading your on accessories or save for your next lens. The monitor, despite being of such importance is forced to take a back seat. We tend to forget that monitor is that key link that is going to reproduce what one had seen and captured in camera. Once you understand the gravity of this, you are bound to go for a photographer’s monitor. And there sits the ViewSonic VP2468. A very affordable monitor meant for photographers that produces nearly 100% of sRGB colour space, and comes factory colour calibrated along with test reports.

When I got the opportunity to work on the ViewSonic VP2468 monitor, my first reaction was wow. Images were just popping up. Colours are so vibrant as if it enthuses a new life into images. My immediate reaction was to reopen some of my earlier edited images. I started hating some of them as colours were way off. I started re-editing them on the VP2468. Here is an example.

Difference in colours editing in ViewSonic VP2468 vs Laptop


The VP2468 has many functionalities which I am yet to explore. The basic controls are enough for me as a photographer. Let the monitor take away many of my worries and concentrate on getting that perfect moment. VP2468 comes with a host of ports on its back. I have connected it to my Dell workstation with a HDMI cable. Another outstanding feature is the Auto Pivot where you can rotate the monitor to view vertical frames in full screen. There is an auto pilot software to facilitate this rotation. Despite some great feature, few ergonomics are missing in the design. You can expect small flaws at this price point. If I am missing something as of now is an inbuilt speaker. But it does what it is meant to deliver – true colour. The VP2468 is going to stay put in my table for a long time.

Wednesday, May 07, 2014

Handling RAW files : Canon DPP or Adobe Camera RAW

Photography is my first passion. Travel complements my photography. My favorite genre is wildlife photography which made me spend lot of time in various jungles of India. As I had started writing about my photographic journey and shared it on my facebook page (Rupankar Mahanta Photography), I felt that sharing it on my blog will connect to a different sets of readers. Following is excerpt from the first article I am sharing here :

Handling RAW files : Canon DPP or Adobe Camera RAW

As I was transiting from flim SLR to digital technology, I acquired a Canon A540 which was a prosumer point and shoot model with full manual control. It was one of the best pocket cameras I had ever owned, much better than the pricier Canon IXUS 120IS which I bought couple of years later as replacement. Being a point and shoot, it could capture only in JPEG format. I hope jpeg do not sound too esoteric here. It stands for Joint Photographic Experts Group and is a commonly used method of LOSSY compression for storing digital images. Read the word LOSSY which actually means what it is. When an image is saved as jpeg some original image information is lost and cannot be restored, possibly affecting image quality. However I was not bothered at all about this then as I had no other options. As I went on to acquire a DSLR, starting with AUTO mode and continued with JPEG for some time. As my understanding of digital photography expanded, I found that technically JPEG is not the ideal form for a photographer. So what to do? Shoot RAW was the ubiquitous advice on net.

Everything has a learning curve. JPEG continued through my transition from the AUTO mode to Av (Aperture Priority). Those days I was not a wildlife photographer and hence never used Tv (Shutter priority) mode.  After couple of months of study I solved the conundrum of RAW. Since then I have been shooting in RAW. There is no loss of data in RAW format images. Almost immediately I was offered with another riddle –what colour space. Digital photography had become too technical!

Leaving aside the subject of colour space for another day, let me continue with handling of RAW files...........................


Here is link to the full article -

Saturday, December 22, 2007

Fatal photography : Man mauled to death by tigers in zoo

This is a true story about which many of which might have read in leading India dailies. One Jaiprakash Bezbaruah, aged 50, was killed by two tigers at the Guwahati zoo on 18th Dec, 2007. But I have collected some photos published in local dailies from Guwahati which will make you feel how horrific was the incident.


This is how it took place : Jaipraksh, who hails from another town, came for a visit of the zoo at Guwahati with his family on the fateful day. Not heeding to warnings, he tried to photograph two tigers in a cage by putting his hand inside the cage, may be in an attempt to get a good shot. That urge for good shot proved fatal for him. One of the tiger attacked so swiftly that he could not even pull his hand out. The tiger cuaght his arm and pulled him towards the cage. The other tiger in the cage also joined soon. They even punched on the face of the hepless victim, resting on the grills of the cage. Imagine all this took place in front of his wife and two young sons. The guards and other visitors tried to make the tigers leave his hand by using sticks. You can see the sticks on the photo at top.f you look closely, you can see both the tigers. But the tigers did not relent till they chopped his hand off at its root. Then they feasted on the hand. Jaipraksh fell down unconscious by the time the tigers left him. He probably have died by then because of excessive bleeding, and may be because the tigers pounced on his face as well. He was declared brought dead in hospital. Ironically, these tigers were ot man eaters. They were breeded in some place at Karnataka. This has perplexed the zoo authorities as well. One should know that most tigers in zoos are man eaters. If a tiger turns man eaters, attempt is made to catch it. They are killed only if repeated attempt to catch them fails. If cought successfully, they are sent to the zoos.

This is a big lesson for all of us. We often tend to get too close for a better view of animals in zoo thinking that caged animal can not do anything. But if your death is imminent, anything can happen.

Saturday, September 15, 2007

First few photos from VOF uploaded

First few photos from VOF have been uploaded to my flickr album. here is one of the appreciated shot. I am unable to find time to complete the travelogue and upload the photos from the entire trip. Hope to complete it by next week.


Meanwhile you can see other uploaded photos by clicking on the flickr badge on the sidebar.

Saturday, August 18, 2007

Shootout at Delhi

A shootout without guns, but with cameras. This was the name of today's photography workshop by Atul Kasbekar, organised by Canon India at The Park hotel. For many of us it was an opportunity to listen to the man who is one of the two brand ambassadors for Canon in India. The other one being Sachin Tendulkar.

Atul Kasbekar is a big name in Indian photography scene. He is the man who shoots the Kingfisher Calender for Vijay Mallaya. The tag Huer campaign with Sahrukh, Airtel campaign with Sachin, Citizen campaign with Kareena, Titan campaign with Aamir Khan, and the list goes on and on. Almost every cover of Cosmopolitan is shot by him.

He enthralled the small audience with insight into some of his editorial and cover works. He also explained some of the shots from the celebrated Kingfisher calender, specially where Photoshop have been used to enhance the images. Commercial photography can not live without photoshop, but according to him one has to be ethical and careful. If someone can point out that you have used photoshop, then you have failed. H also throw insight onto one his favorite technique -- use of fill flash. In one of the shots for Kingfisher calender, he made 11 am in the day looked like night by use of strong fill flash. That was amazing.

He opined that equipment should liberate the photographer. Photographer should not be too worried about the equipment. Well, for someone who shoots with an EOS 1D Mark-II with L lenses can certainly feel liberated. After a sumptuous lunch, a demo shooting session was arranged with a model. It was really amazing to see that almost every shot he took was good. Someone asked him about the lens he is using. The reply was : 85 mm f/1.2L II USM, which to him is one of the finest lenses Canon have ever produced. Sigh!! we can not afford a L lens, forget about a f/1.2


I understood that Canon keep organising such workshops from time to time in Delhi and Mumbai. An invitation was probably not mandatory. One could have hung a Canon DSLR on his neck and can walk into it. But Canon certainly spends a lot of money on such workshops which are normally arranged at 5 star hotels. Obviously, the hole that gets dug in your pocket when you buy Canon from its dealers sponsors such events.

Friday, August 17, 2007

Photo workshop by Canon India

Canon India is organising a photo workshop cum seminar to be conducted by renowned photgrapher Atul Kasbekar at The Park, New Delhi on 18th Aug, 2007. I was thrilled to receive an invitaion and phone call from Canon India regarding my participation at the event . It appears to be an inviation only event.

The apparent reason for my invitaion is because I had registered my EOS for the Canon Edge program at the Canon India site. Thus this is a direct result of registering which we often overlook. Anyway, I am looking forward to utilising this opportunity.

Thursday, April 05, 2007

From Travel Photography to Fashion Photography

Amit, the young aspiring model got ready. The studio lights were switched on. Munish explained the lighting situations, like positioning of lights, shadows, no of lights to be used, etc. The group was further sub-divided into groups of two each. Everyone was to play photographer and assistant photographer in turns.

For many of us, including me, this was to be the first experience of photography under studio lights. We were left on our own to shoot. I set my camera to Av (Aperture priority) mode. My knowledge till then said that portraits are shot with large aperture for shallow DOF or throwing background out of focus to make the object stand out. Well that funda went through the window very fast. It turned out to be true only for Outdoor shots, not for indoor shots. I shoot the first photo at f/5.6. It was a horrible shot, good enough only to be kept as a memento. Soon someone more experienced pointed out that in indoor studio lighting situations Av mode does not work. So one has to override it and use M (Manual) mode instead. Good lesson 1.

However, lesson 1 imparted by the fellow learner also had a bad part to it. -- Keep shutter speed at 1/60 and aperture at f/8. Without applying much thought, I shot almost all 50 odd photos at that setting. The disappointment was huge, when photos were analyzed later with Munish. Most of them got unacceptably overexposed.

As the shoot progressed I picked up few new things. Like using a flash trigger (a blue tooth device) or the old flash sync chord. Even switching on and off the studio lights also requires certain knowledge like discharging the capacitors, model lamp, putting it on half or full, etc. The best part of it was probably to find out ourselves that the inbuilt camera flash is one of the most useless things for indoor shoots. They do not work with studio environment. These are good only for the purpose of using as a fill in light in daylight outdoor shots.

On the following weekend I got another chance to rectify my mistakes in another portfolio shoot. Equipped with comments from Munish, I did a self analysis of the earlier shots and made a list of what should have done or where I made glaring mistakes. It was a great improvement over last week. One of the shots of Gaurav, who also is a fellow student in Munish’s academy, is uploaded here. Other shots can be seen my flickr album. I tried a few things on this second assignment and took the photos across a range of settings so that I can analysis them further improvements.

Overall the experiences were very educating. Indoor photography turned out to be different kettle of fish altogether. One can learn basics of outdoor photography even by reading books, like I did. But one has to be associated with an experienced photographer to learn to handle lights. Getting to learn in studio situations was one of the reason why I joined Munish’s academy.

Monday, February 05, 2007

Gone Digital

5 years after I picked up my Canon EOS 300 film SLR, I had retired it. Yesterday was the day when I could acquire a Digital SLR. Once out among budding professionals and advance ametures, it had dawned on me that flim is really outdated. We were late to adopt.
Canon was the obvious choice because of my old lenses. 30D is out of reach. So choice had to made between 350D and 400D. I had read a lot on both these models in forums. 350D had no issues reported, while many had reported underexposure problem with 400D. Some even quoted as Canon acknowleding this problem. I tested both. I could not convince myself to buy the 400D. So, I setlled for 350D. It cost me 30200 in grey.
One thing now I will be missing is the excitement of seeing how the photos have come. But my heap of album will not increase that fast and I will not not have to find shelf space for them. I had worked out that even though the intial investment is high by Indian standard, it will even out in the long run. Processing a 36 exposure roll costs almost 300 (including roll price), i.e. almost 8 per print of 4x6. In a roll you normally get 20 presentable photos. So the money on 16 is a total waste., i.e., every roll you wastes 130 or so. For 20 rolls a year, it is a good 2600.

Thursday, January 18, 2007

Delhi outings: Humayun's Tomb

Fog in Delhi is a dreaded word in aviation industry. Dense fog sends every travel service for a toss during peak winter. Hardest hit are the airlines, followed by railways. Ironically, we had seen fog only in televisions, even though we live in Delhi. But on the morning of 31st December I had a different experience. Munish had called the group for a photo session at the historical monument of Humayun’s Tomb in Delhi. The time frame was dawn to sunrise. The theme of the shoot was compositional technique like framing, abstraction, etc. and this monument provides a good opportunity for honing one’s skill.

Waking up very early in the morning at the call of my alarm ring, I looked into the sky and saw no fog around. The 4 km stretch upto the Nizamuddin Bridge was almost clear. But once I was on the NH24, a blanket of fog seemed to have appeared from nowhere. The more I went ahead, the denser was the fog. Soon I got engulfed by a thick envelope of fog. Visibility was as low as 20 mtr. It was scary. I seriously thought of turning back but there was no U turn until I had to cross the Nizamuddin Bridge. Thus I managed to reach the other side of Yamuna. I pulled the car to one safe spot and called up Munish to give an account of the situation I am in. Munish told me that nothing is visible even at Humayun’s tomb. He advised me to take some photos of surroundings and then go back. But my wife, who was accompanying me hoping for a morning walk, opined that as we had came that far getting up so early in the morning, we should try to reach our destination and so drove ahead. Surprisingly, once we reached the residential area around Ashram crossing, there was no fog. This explained why there was no fog around my house and why we have not seen any fog till now except in television. But once I turned right from Ashram and had crossed the Nizamuddin railway station, the envelope of fog reappeared. Tearing through the fog, I made it to the parking lot of the Humayun’s tomb. Once inside the park, we were at a loss. Nothing was visible in that thick fog. I rang up Munish to ask for direction. After wandering for few minutes, I found the ticket counter. Paid the 20 bucks entry fee and we were allowed in.

Humayun’s tomb turned out to be a magnificent monument. It is the mausoleum built by Hamida Banu Begum, wife of Humayun around 1572. The entire campus has many buildings and structure. However, the main tomb towering nearly 47 mtr, stands majestically on a platform of 12000 sq mtr. Humayun was the second emperor of the Mughal dynasty that had ruled Delhi. It is believed that the Tajmahal at Agra is inspired by this monument. The entire structure has more than 100 graves, thereby earning the name of ‘Dormitory of the Mughals’.

As we were leaving around 10 am, tourists had started trickling in. Most of the tourists are foreign tourist. Ironically, this monument is not covered in the local sight seeing tours. This is such an important monument in the history of Mughals and Delhi, and yet it is given a miss. Even I have seen it after spending almost 3 years in Delhi, courtesy this photo shoot. A tourist is taken to only popular and well known places like the Red Fort and Kutub Minar. But one should try to deviate from the regular schedule and explore other possibilities. The best way to travel in Delhi is to hire a car. The hiring charges for a local trip is Rs.500/- for 80 km and 8 hours. Spending about a 1000 bucks one can enjoy Delhi at his own pace.

We spent about 2 hours clicking around. For the first time I actually felt the need of a DSLR camera. Film is really outdated. I soon will be upgrading, probably to Canon 350D.

Monday, December 11, 2006

A photographic trip near Delhi

My assimilation into the group learning photography under Munish Khanna is going on. The group had a good mix of amateur, hobbyist and wannabe professional. On my second day of classes, I had joined the group yesterday on a photographic trip to a village near Delhi.

Traveling out of Delhi, we first landed in a village like place named Bhatti Mines, some 13 kms from Mehrauli (near Kutub Minar). It actually is a settlement set up by Sanjay Gandhi way back in 1976. The guys pulled out their cameras and started shooting – without even asking for permission. Honestly speaking, I was a bit surprised. So do some localites. Soon people started gathering and started asking questions as to who are we, why are we taking photos. Someone suggested taking permission from the village Chief. He agreed initially, but then trouble started. Some people incited him against the group. It is understood that there have been attempt to evict them by government officials and so people have become suspecting to outsiders, even media. They were not sure whether we were actually photo hobbyist or journalist. Before it was too late, we left the place after assuring them that nothing objectionable had been clicked.

After a little bit of searching on the Mehrauli – Faridabad road, we found another village named Bhatti Khurd. Surprisingly no one here any objection to getting clicked. Everyone cooperated. The difference between the two villages was that this one is a proper village with simple people while the earlier one was a settlement. We all took photographs using our own creativity. There happened to be wedding in the village that day. The wedding provided additional opportunity for photograph.

It was quite an experience. All had taken photos. But they are yet to be assessed and commented upon by Munish. I have uploaded two of my favorites from my digital shots.

Friday, November 24, 2006

Learning Photography in Delhi

My knowledge of photography was built upon articles and books I have read on the subject. But the practical or handholding aspect was missing in that knowledge bank. I had always wanted to associate myself with some experienced photographer and have the feel of their working. But the places where I had lived in the last few years had very limited options or nothing at all as far as learning photography is concerned. In my job, Delhi and Mumbai are the only places where I can get such opportunities. So when I moved to Delhi this year, I was determined to grab this opportunity.

After scouting the market, I found out several institutes, but all of them have full time courses. My full time government job is my bread earner and I can afford to indulge in a costly hobby like photography because of the job. This meant that a full time course is out of question. Moreover, the cheapest I found was offered by Delhi Film Institute at a price of Rs.27,500/-. The three month course by Asian Academy of Film and Television (AAFT) costs a whopping Rs.45,000/-. That’s a lot of money, specially when you are learning something for hobby. My idea of learning was to get attached with some established photographer and learn from the experience of working with him. And that again should suit my timings. It was a tough call.

But one morning I read about ace photographer Munish Khanna in the Times Education supplement. I was thrilled. What Munish was offering through his Photography Academy was exactly I was looking for. I searched the net and found out more about Munish and his photography course. Then I fixed up an appointment with him.

It eventually took 3 months for me to meet Munish as I could not find time. Finally, on last Sunday, I had an interaction with Munish at his studio. He was busy shooting a portfolio assignment of a model. As asked by Munish, I carried my hurriedly prepared portfolio of 3 albums. He appreciated some of the shots and told me ‘So you want to learn beyond it’. I told him about my aspirations and reasons for joining his course.

I was impressed with his attitude and facilities. Moreover, this is exactly what I wanted. Munish is into professional photography since 1993. He has converted the first floor of his duplex house at Uday Park (opposite Ansal Plaza near Khel Gaon in Hauz Khas, South Delhi) into a full fledged studio. My training will start from the first week of December.

Munish’s Photography Course:
His basic course has a 64 session curriculum. It includes lectures, presentations and practical. There is no hard and fast class schedule. It is upto the student how fast he can complete. A weekly schedule is sent to the students who can choose which class he wants to attend. For this course he charges a lifetime fee of Rs.12000/-. The fee entitles to many lifetime services from Munish like critical review of your shots, etc.

He even has short time and crash courses for those who are from outside Delhi. This is basically an abridged version of full course. This has 32 sessions and covers most important topics. It costs about Rs.7500/-. But if you are interested in real photography, you should go for the full one.

Munish teaches in his own style with his own curriculum. The course will not give you a certificate (if you are looking for job). But it promises to make you a successful photographer. So if you are in Delhi and wants to learn photography, then probably this is worth giving a try. I will be updating my experiences from time to time.
Where else you can learn in Delhi:
1) Asian Academy of Film and Television, NOIDA (www.aaft.com). Cost Rs.45,000/-
2) Delhi Film Institute, D-20, South Extn-I, Ph-011-41648670/71/72. Cost Rs.27,500/-
3) Motion's Instutute, H-10, South Extn-I, Ph-011-41349615, 55492220. Cost- NOT Explored.
4) India International Photographic Council, Modern School, Barakhamba Road. 6 Months course. Cost-NOT Explored.
5) Triveni Kala Sangam, 205, Tansen Marg,CP. Ph-011-23718833. Cost - NOT explored

Thursday, November 02, 2006

Photos from Lakshadweep

I have uploaded some of the photos from Agatti, Lakshadweep. Open the link of photos in the side bar (flickr.com) and watch them in slideshow. Scanned photos are low resolutions upload. These are my SLR photos. Originals selecetd for scanning were exceptionaly clear and sharp photos. Please let me know your comments.

Tuesday, August 23, 2005

The Crashed Car


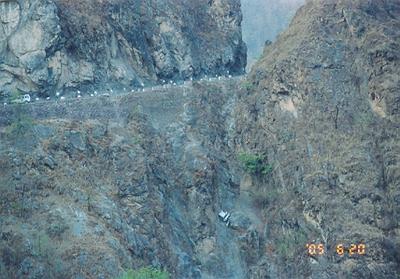
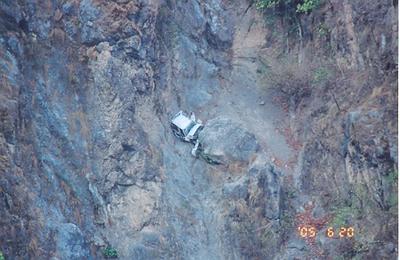
This car was seen dangling between rocks about 10 km upwards from Byashi on the Rishikesh - Badrinath route. We were told that nobody survided. The car is in no condition to be pulled out. A grim reminder of what may happen as a result of rush driving in the hills. I had to zoom this at 300mm for this view. See the other one below.

For your information , a few more new photos of Badrinath trip has been added to my albums at Albumtown .

Friday, July 08, 2005

Photographs

I understands that many of my readers are not able to view photgraphs of Badrinath posted in my blog (may be because of websense). My photographs can be seen now at www.albumtown.com/rupankar/ . A link to this website is also provided on the right. Hosting an album is the best way to share your photos with friends and family rather then sending them as attachments in mail. You also can share your photographs through albumtown. It is fairly easy and provides free storage space of 50MB. This is good enough space if you know how to scan for net. My photgraphs are mostly scanned at 75 dpi. I have wrote about scanning in one of my earlier posts. Yahoo also offers photo sharing facility which gives you 30MB of free space. But that site is also not opening properly because of websense.

Sunday, July 03, 2005

Scanning photographs: What resolution we should scan at?

You may be elated at acquiring a good scanner that is capable of scanning at 1200X1200 dpi or above. But soon found that file size of your 4X6 photograph scanned at 300 dpi is more than 1MB and will be tough to upload onto internet or send it through email. You are worried that scanning at lower resolution may result in loss of detail. So you are caught at the dilemma of what resolution to use. I had experimented with various resolutions and formats before deciding to do a bit of research on the net. I have compiled the findings to get you of this diaspora.

Photographic Resolution :
Scanning color prints can rarely yield more detail when scanned at more than 300 dpi. The word color prints is to be noted here, to exclude film and B&W prints. In particular, we are speaking of typical 6x4 inch (4X size of 35 mm negatives) color prints. It is generally difficult to detect much practical benefit when scanning above 300 dpi (and frankly, sometimes above 200 dpi for not that sharp snapshots from inexpensive cameras). Higher resolutions are meant for scanning negatives which helps in capturing much finer details in they possesses. Enlargements produced from scanned negatives always gives better results then from scanned prints.

The HP scanner web site says:
"A Note on Resolution: The vast majority of scanning projects require resolutions lower than 300 dpi. For example, scanning a photograph at resolutions higher than 150 to 200 dpi only produces a larger file, not more detail."

Tips: If you plan to print your images in a magazine or book, scanning at 300 or 600 dpi is highly recommended. You can scan once, save a high resolution (600dpi) TIFF file, then change the resolution to 72 dpi and save another copy as a JPG for the Web. Later, when you want the print resolution image, you'll have it.

Scanning for Video / Your PC :
Scanning for viewing or displaying in PC is totally different from scanning for print. For images viewed on computer screens, scan resolution merely determines image size. The bottom line is that dpi or ppi means pixels per inch, which means that if you scan 6 inches at 100 dpi (or 1 inch at 600 dpi), you will create 600 pixels, which will display on any screen as 600 pixels in size. We think of greater resolution as showing more detail, and while that's generally true (within reasonable limits), it's because it makes the image larger.

Your scanning resolution is determined by the screen resolution of your PC. The most popular screen resolution for a 15” monitor is 1024 X 768. We often scan at higher resolutions to fill more of the screen. When we increase scan resolution, we get more pixels, so it increases the image size. But a little goes a long way, and there's no advantage in wrestling with overly huge images just to discard most of the pixels when we display them. So don't scan at 300 dpi or 600 dpi when there's no purpose for it.

If you scan a 6x4 inch photo at 110 dpi, then you will necessarily get an image size of
(6 inches x 110 dpi) x (4 inches x 110 dpi) = 660 x 440 pixels
which more or less totally fills a 640x480 monitor screen.
Or scanning the 6x4 inch photo at 140 dpi gives
(6 inches x 140 dpi) x (4 inches x 140 dpi) = 840 x 560 pixels
which more or less totally fills a 800x600 monitor screen.
Or scanning the 6x4 inch photo at 180 dpi gives
(6 inches x 180 dpi) x (4 inches x 180 dpi) = 1080 x 720 pixels
which more or less totally fills a 1024x768 monitor screen.

In real world practice, we are much more likely to scan at round numbers like 100, 150 or 200 dpi (giving 600x400 pixels, 900x600 pixels and 1200x800 pixels, from a 6x4 inch photo) instead of 110, 140, or 180 dpi. Ideally for sharing in web your images should be not more than 100K at 1024X768 pixels.

File Format :
TIF file format is the undisputed leader when best quality is required. TIF is very commonly used in commercial printing or professional environments. It is best suggested for preserving the master copies. But file size is very large.

Web pages require JPG or GIF or PNG image types, because that is all that browsers can show. On the web, JPG is the best choice (smallest file) for photo images, and GIF is most common for graphic images. (.JPG file extension, pronounced Jay Peg). This is the right format for those photo images which must be very small files, for example, for web sites or for email. The JPG file is wonderfully small, often compressed by 90%, or to only 1/10 of the size of the original data, which is very good when modems are involved. However, this fantastic compression efficiency comes with a high price. JPG uses lossy compression (lossy meaning "with losses"). Lossy means that some image quality is lost when the JPG data is compressed and saved, and this quality can never be recovered.

Never save scans for the Web as GIFs or BMPs, because those formats throw away about 16 million colors, most of which you probably want to keep, and once they are gone, they're gone. TIF and Photoshop formats keep more information in the image while you are editing it. After editing, Saving a Copy As JPG format gives you Web compatibility and reasonable compression with good file size.

Scanning Resolution for Printing:
Scanning for Printing and for viewing in PC calls for scanning at different resolutions. If the purpose is about printing, perhaps the goal is to print 8x10 inches at 300 dpi. Then to do that, we need an image size of (8 inches x 300 dpi) x (10 inches x 300 dpi) = 2400 x 3000 pixels. If scanning an 8x10 original, then 300 dpi will create 2400x3000 pixels. But if scanning a 4x5 inch original, then it takes 600 dpi to create 2400x3000 pixels. However if we only intend to print 6x4 inches at 300 dpi, then 1800x1200 pixels is the right goal. You must decide what you want, but the answer is entirely about pixels per inch (often called dpi). If you want to print the image to be 6x4 inches at 300 dpi on paper, then the requirements for the image are : (6 inches x 300 dpi) x (4 inches x 300 dpi) = 1800x1200 pixels. This image is larger than most video screens. Printing typically requires a larger image (more pixels) than does the video screen.

In most programs like Photoshop or PhotoImpact or PhotoDeluxe, the scans are printed at real size. That is, if you scan a 6x4 inch photo, and then select the menu FILE - PRINT, it will print 6x4 inches on the paper too. Resolution does NOT determine image size on the printer as it does with video. The size of the original scan area determines printer image size. Lower resolution can look fuzzy, and higher resolution may look better, but the printed size will be the same at any scan resolution. Printed resolution works like we think of resolution, as increasing image detail instead of image size. Printed pages are normally a standard size defined in inches, 8.5 x 11 say, so printed image size in inches is very meaningful too. The printer driver will try to print the image at its original size in inches, unless told otherwise. Conversely, video screens don't care about inches. If you have a 600x400 image, video monitors will show it as a 600x400 image (unless the viewing software's goal in life is to make it fit or fill the screen, etc). Notice that both techniques do maintain the same relative size of the image to the total size of the page or screen.

Scanning for Magazine / newspaper prints :
Magazines and Newspapers use a different parameter called LPI (Lines Per Inch). The resolution requirements are as under --
Magazines 133/150 lpi - scale to 225 to 300 dpi.
Newspapers 85/100 lpi - scale to 150 to 200 dpi
Many magazines use 133 or 150 lpi, for which scanning at 133 lpi x 1.5 = 200 dpi is fine for many cases, but many editors will habitually ask for 300 dpi. 150 to 200 dpi images are enough for printing in newspapers at 85 or 100 lpi.

Conclusion :
By now you have got a fair idea of what resolution is to use. Ask yourself, “How many times you are going to print enlargements from scanned prints?” The answer will probably be NIL. For most of us the main purpose of scanning is to share it with friends and family over the internet. For preserving in CDs, scan at 300 dpi. File size for a 4X6 print at 300 dpi will be around 650K. Then save another copy for sharing over net at around 100 dpi or less to keep file size less than 100K. All these, however do not mean that you should not be too worried about the resolution of the scanner you are buying or you should not boast of higher resolution of your scanner. You should still go for the scanner with higher resolution as a 150 dpi scan from a 1200 dpi scanner will still give you a better result then from a 600 dpi scanner. In fact for good quality scanning 600 dpi is considered just good enough and you should not buy anything less than that. Further, the Bit Depth should be at least 30 (most new models has the max. of 48) and Optical Density should be at least 3 (max is 4). So, you should still feel happy about your acquisition.